Fujifilm brings an immersive photo and brand experience to Toronto’s trendy Annex district, in the re-imagined Annex Photo store.
How to Place Your Artwork Perfectly
Jul 17, 2024
Home Blog
How to Place Your Artwork Perfectly

Tips for Artwork Placement: A Guide to Perfectly Positioning Your Art, Including Downloadable Examples 

How to Place Your Artwork Perfectly | Tips for Artwork Placement: A Guide to Perfectly Positioning Your Art, Including Downloadable Examples | Annex Photo Toronto

Hanging artwork can be an art form, but it's not rocket science. By following some basic guidelines, you can ensure your pieces are always displayed to their best advantage. Remember, these are guidelines, not hard and fast rules. There are many factors to consider, such as artwork size, wall size, ceiling height, furniture height, and personal preference.


Although this post focuses on art, these tips are useful for hanging framed or unframed artwork, photographs, mixed gallery walls, decorative mirrors, or grouped decor like baskets or plates.


When artwork is hung at the right height and in proportion to the room and its furnishings, it enhances the space and ties everything together. Let's dive into the essentials for positioning your artwork perfectly.


Start with a Strategy


Most people start by printing an 8x10 photo, buying a frame for the photo or artwork, and then wondering where to hang it. Instead, let’s begin with a strategy. Consider the room, location, and the overall look you want to achieve, whether it's clean and minimalistic or full and eclectic. You’ll also want to think about whether you will be mixing your artwork mediums i.e. photos, art, canvas, etc. Once you consider all the factors, you’ll get a better sense of what to hang and how to position your artwork.


Some great tips we provided in our How to Create a Stunning Gallery Wall blog are certainly relevant when it comes to correctly positioning your artwork…


One option we recommend is to start by laying out the picture frames and artwork on the ground to visualize the arrangement and spacing. Ensure a balanced mix of materials and colors, and a smooth visual flow from one piece to the next. Capture visual interest by varying sizes, spacing, medium and more.


Another effective technique is to map out the frame arrangement directly on the wall using paper. Trace each frame onto paper, cut out the shapes, and tape them to the wall. This allows you to easily adjust the layout until you achieve the desired balance. Once satisfied, use the paper templates as guides for placing nails and hanging hardware. We recommend positioning wall art at eye level; however, if you have higher ceilings, you can arrange your gallery wall higher for a dramatic effect.


Another way to visualize your gallery layout is to measure the wall space and create a document on your computer to mimic the wall and all the art pieces, including sizing of everything. This way you can quickly and easily rearrange the pieces in a virtual area. Whether you are using a more linear layout of a free-flowing arrangement, you will be able to get a good feel for what your wall gallery will look like all while sitting at your computer.


General Guidelines for Positioning Artwork


When hanging pictures and art on the wall, people often place them too high. Framed prints should be positioned close to furniture to create a cohesive look and low enough on the wall to be viewed comfortably whether sitting or standing. However, these are guidelines and there are some other considerations like height of family members, ceiling height, furniture, etc. to keep in mind.


Let’s Talk Artwork Height


  • The Eye-Level Rule: 57-60 Inches from the floor; this range ensures the artwork is comfortably visible whether you're sitting or standing. The centre of your artwork should hang about 57 inches from the floor, or at eye level for most people, especially in rooms where people tend to be sitting.
  • Rooms with Low Ceilings: For ceilings below 8 feet, divide the wall into four sections from the bottom up and hang your art in the third section.
  • Tall Family Members or High Ceilings: Aim for the upper range of 60 inches if your family is taller or the room has high ceilings.


Positioning Artwork Above Furniture


Art and furniture should be positioned close enough to appear as a unified whole. The space below your art is much more important than the space above it. If there is a large gap or if one piece is out of proportion with the other, they will seem disjointed, and the art will look like it is floating on its own.


  • Artwork above Sofas, Beds, and Other Furniture: Maintain a space of 6-12 inches between the top of the furniture and the bottom of the artwork. This creates a cohesive look and prevents the art from appearing to float independently. If the furniture is quite low, consider hanging the art on the lower end to connect the pieces. And if your ceilings are really high, you can hang artwork between 10 to 12 inches above the furniture to fill the wall space.
  • Artwork above Sofa in Living Room: Art above a sofa should connect visually to the furniture. Leave 6-12 inches between the bottom of the frame and the top of the sofa. Generally, you and your guests will spend most of your time sitting in this room, so err towards 6 inches.
  • Artwork above Bed in Bedroom: Above the headboard, maintain a space of 6-10 inches to keep a connection between the furniture and artwork. If there's no headboard, follow the general eye-level guideline of 57-60 inches.
  • Artwork above Bedside Tables: Use the rule of thumb of 6-12 inches above your furniture. However, you should also consider lamps and décor on your table as this can mean positioning the artwork higher.


Positioning Artwork in Specific Rooms or Special Locations


  • Staircase: Hang a piece every third step to achieve a diagonal arrangement. Measure up from every third step to form a diagonal line at eye level (57-60 inches).
  • Hallways: Hang pictures slightly higher (around 60 inches) to accommodate standing viewers.
  • Kitchens: Place artwork in areas where it won’t be damaged by water or heat. Avoid clichéd motifs and opt for pieces that complement the room's decor. In the kitchen, consider placing your artwork above open counter space, near the dining table, or above a kitchen desk or command centre.
  • Bathrooms: Like the kitchen tips, you’ll want to position artwork where it won’t be damaged by water. You’ll also want to focus on overused themes and instead choose classic pieces that work with the room's decor. If you are placing artwork above a towel bar, consider that you’ll want it far enough way from the towel bar so it isn’t knocked off or damaged while using the towel. However, you still don’t want to hang it too high, so consider scaling and proportions so that is placed in a way that looks great and is practical.
  • Dining Room: Hang artwork a bit lower since people will mostly be seated. Find a comfortable height while sitting and use taller decor items to link the art to the furniture.
  • Entryway: Since you’ll always be standing, hang artwork at the higher end of eye level (60 inches).
  • Above a Fireplace: Since the space above your fireplace is likely above eye level, hang the artwork so that there is 3 to 7 inches between the mantelpiece and the bottom of the frame for comfortable viewing from a seated position in the room.
  • Above Wainscoting: When hanging your artwork above standard wainscoting, the centre of your piece should be approximately 58-62 inches from the floor or about 4-6 inches above the top of the wainscoting.


artwork placement guidelines and tips annex photo toronto

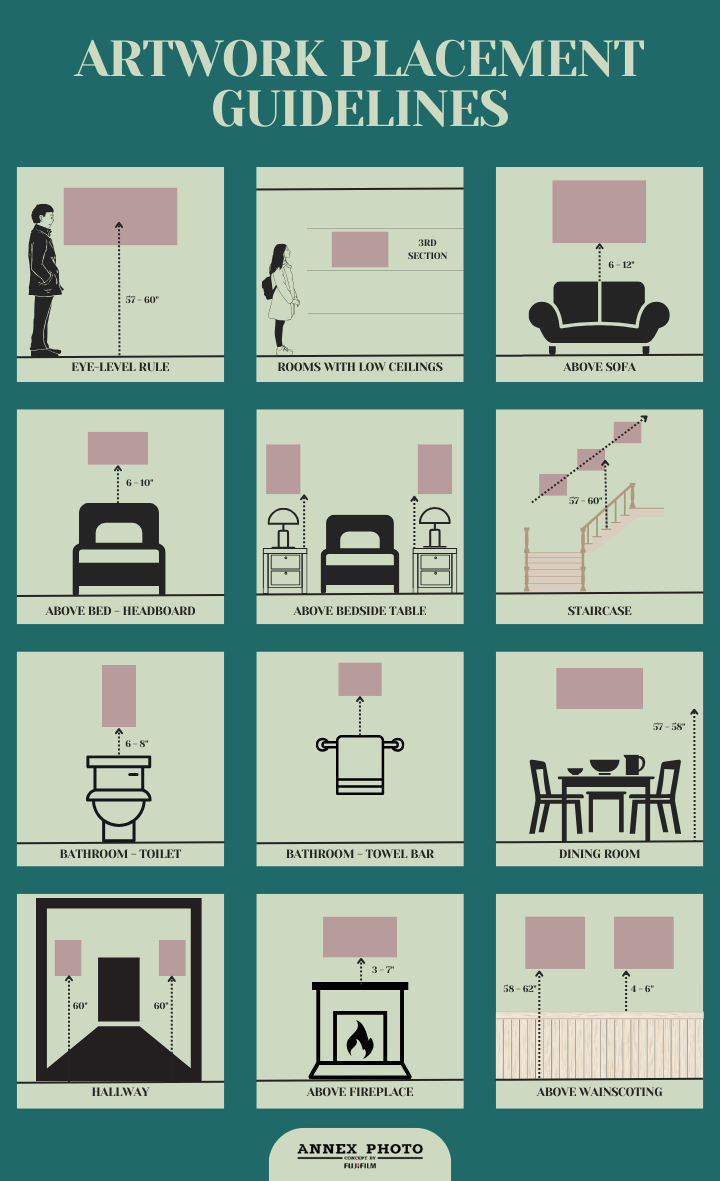
If you’d like a little more direction to help you position your artwork, we’ve created a downloadable Wall Art Placement Infographic just for you!


Download the Wall Art Placement PDF by clicking on the image to the left.

Or, click here to download the Artwork Placement Guidelines image.


Positioning Artwork in Groupings


Scaling and Proportion of Your Artwork


  • Artwork Size: Ensure the artwork is in scale with the furniture it hangs above. Ideally, it should be two-thirds the size of the furniture piece.
  • Large Walls: For larger walls, consider multiple pieces or a single large piece to fill the space adequately.
  • Large Artwork: If you are hanging artwork that is taller than 120 inches, ensure the bottom edge of the piece is approximately 12 inches from the floor.


Detailed Steps for Hanging Artwork


  1. Determine Desired Height: Decide where you want the centre of your frame to hang (usually 57-60 inches from the floor).
  2. Measure Frame Centre: Measure the height of your frame and divide by two to find the centre.
  3. Account for Hanging Hardware: Measure from the top of the frame to the top of the tightened picture wire or hook. Subtract this from your frame centre measurement.
  4. Calculate Hook Position: Add this final measurement to your desired height from step 1 to determine where to place the hook or nail.


Example Artwork Height Calculation:


  • Desired height from floor: 59 inches
  • Frame height: 24 inches (centre is 12 inches)
  • Top of wire 1 1/2 inches below frame top: 12 – 1 1/2 = 10 1/2 inches
  • Final hook height: 59 + 10 1/2 = 69 1/2 inches from the floor


Enhance Every Room in Your Home with Perfectly Placed Artwork


By following these tips, you can ensure that your artwork is hung correctly, enhancing the aesthetic appeal of your space and creating a harmonious and visually pleasing environment. Whether you’re dealing with a large canvas or small, framed photos, proper placement will make all the difference. Remember that these are simply guidelines, you can feel free to be creative with your artwork positioning so that it feels right for you.


If you need any help with positioning your artwork, reach out to the experts at Annex Photo.


explore selection of photo frames shop now annex photo toronto

Share

Most Recent Posts

Digital vs. Film? 8 Reasons Digital Photography Triumphs Over Film Photography | Annex Photo Toronto
19 Aug, 2024
Digital vs. Film? 8 Reasons Digital Photography Triumphs | Digital Photography Offers Some Powerful and Incontrovertible Advantages Over Film Photography| Annex Photo by Fujifilm Toronto Canada
11 reasons to capture the moment with the art of analog photography Annex Photo by Fujifilm Toronto
25 Jun, 2024
11 reasons to capture the moment with the art of analog photography | Annex Photo by Fujifilm Toronto Canada
How to Create a Stunning Gallery Wall | Annex Photo Toronto
29 May, 2024
How to Create a Stunning Gallery Wall | Tips for Planning & Making Your Timeless Gallery Wall, Including Layout Examples | Annex Photo Toronto
How to Select the Best Film for Your Photo Project Blog Header
22 Apr, 2024
In the world of analogue photography, the choice of film can drastically influence the outcome of your photos. Various film types offer distinct characteristics that shape the final photograph. But with so many options, which film would work best for your photography needs? With this blog we will be detailing the best films to use for any situation, making sure you have the full scoop on every type, trend, and version of film we have in-store and online, ready to purchase.
How to Embrace the Vintage Photography Aesthetic in Your Modern Retro Photography | 9 Creative Retro
04 Apr, 2024
The surge in popularity of vintage cameras and retro photography techniques has been remarkable in recent years, igniting a renewed interest in nostalgic visuals, warm color tones, and analog-style photography. Whether using authentic film cameras or digital applications that emulate retro effects, the distinct tonal characteristics of film photography can now be effortlessly replicated digitally, enabling anyone to infuse their images with a retro flair with just a few taps. Spanning from traditional film photography to retro-themed editing applications and color palettes inspired by bygone eras, here are the top 9 retro photography trends shaping the landscape of 2024.
Increase Photography Business Revenue: Expanding Photo Printing Product Offering
11 Mar, 2024
In the dynamic world of photography, capturing moments is just the beginning. As a photographer running a successful business, it’s important to also look at revenue streams. To grow a photography business, expanding physical photo product offerings can be a great way to supplement your photography services fees with additional revenue. Clients will welcome a full-service photographer who provides recommendations and options of additional photo products that enhance the professional photoshoot. Let’s explore diverse printing choices available to portrait, wedding, event, landscape, sports, and pet photographers, uncovering how each option adds a unique dimension to their craft and allows them to create lasting mementos that their clients will appreciate and be happy to pay for.
EXPLORE MORE
Share by: